UPDATE August 2023: Consider this a HISTORY lesson in videoconferencing. Enjoy!
Rating: 4 WaterTowers (high quality video w multipoint for everyone)
As you are aware from previous blog entries, the latest round of desktop videoconferencing applications, while very good, are aimed at the corporate infrastructure and user. If you are a small business standing out there all alone, your choices for desktop videoconferencing are few and dwindling.
Appia Communication’s Applause Videoconferencing gives us a glimmer of hope since they provide a videoconferencing service for the Small Business.
Hearing this, and being a “very” small business, I just had to test it. Sooooo, it was with great enthusiasm that I gave the Applause Videoconferencing service a try.
And I’m glad I did. The meeting worked great!
Really quickly, Applause Video:
- Is targeting the small business with smaller budgets and fewer resources (Yeah!)
- Is a centralized service; you download and install a desktop app.
- Only works on Windows XP or Vista (Windows 7 will be supported when it arrives)
- Requires a fairly powerful computer (but…read on)
- Requires (for video) a web cam (my Logitech 9000 works great)
- Requires a good chunk of BW at full operation (but it can be adjusted to work under BW duress)
- Is not interoperable with H.323 / SIP endpoints (but uses H.264 for video)
- Offers a Chat capability
- Offers desktop sharing (or rather desktop presenting)
- Can record the meeting
Result
It works really well, with only a few minor glitches that are normal with a new application.
System Requirements
The user will need Windows XP or Vista and a fairly powerful (recommended) hardware system. The following chart has the basic requirements.
Note: Even though these are the recommendations, I used my trusty old Toshiba laptop (Dual Core, 1.3 GHz) to run the video app and it worked just fine.
|
Send Video* |
Up to |
Up to |
|
Processor |
Quad Core |
Dual Core |
|
Clock Speed |
2.0 GHz or higher | |
|
Memory |
1 GB or higher for XP, | |
|
Operating System |
XP (SP 3 or higher) or | |
|
Microsoft .NET |
2.0 or higher | |
|
Audio Card |
Physical or onboard | |
|
Video Card |
256 MB | |
Bandwidth Requirements
If you are bandwidth challenged, the Applause application can be adjusted to work with the bandwidth you have available.
During the meeting we practiced sending very high quality video back and forth and it was very good. At the TracyVirtualOffice, I have 2.5 Mbps upstream and can get 25 Mbps down when connected via wire. I tested Applause using wireless which routinely gives me 2.5 Mbps up and 10 to 11 Mbps down.
Here are some of Appia’s BW recommendations:
|
Host’s Resolution |
Bandwidth* |
|
320×240 |
92 kbps |
|
640×480 |
458 kbps |
|
1280×720 |
915 kbps |
Pricing
Since pricing can be more complicated than technology, I tend to stay away from that area (as you know). That said…..here is the link to the Applause Video pricing.
Installation
After downloading the application, I did the installation. It worked fine, except for the small issue of a critical error. Arrrghhh…
As it turns out, this is because the application did not automatically sift through the options to find my web cam (it landed on Google Adapter?). As we discussed this issue in the meeting it appears that this is a minor issue (despite the critical warning message) that the Appia techies can (probably easily) address in software.
Once we got past the error, the view out my window came in very clear (Figure 1).

Making a Call
As usual (for me), I called into the meeting with Mike Pfannenstiel, Director-Business Development, without reading or spending time setting the system up.
Do not attempt this at home since that is not a good thing to do, but, since this is targeted for those with little experience, it turned out ok since it turned up a few usability issues that Appia can address before the next version.
Connecting to the “appia demo” location was easy as long as your “Host” has given you the proper login and password. Just click on the appia demo location and click “Open”.

I wondered why it is “Open” and not “Call”? After all, this is a videoconferencing “Call”…I have rarely made a videoconferencing “Open”. Anyway…..just being nit-picky…..like always. 😉
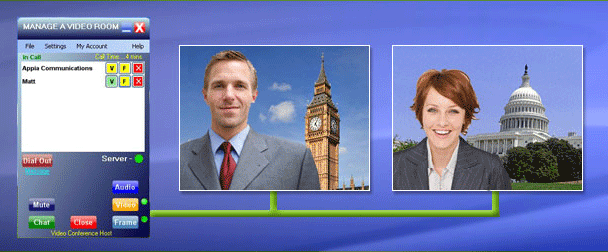
In short order, I was connected in the “appia demo” awaiting the arrival of Mike (the other Mike…).

The above picture shows what you see when you call in but your host has not yet arrived. There is an audio message that tells you to test your mic and camera. To hang up the call you hit the “Close” button. I understand that “Close” is the opposite of “Open” and it makes sense. But why not the words “Hang Up” ?? OK, I’ll stop 🙂
I could see that Mike arrived (Figure 4), but to see him, I needed to click the yellow “V” in the control box. Once I did that….Mike showed up in the meeting (Figure 5)!


We connected fine but, there was a slight problem. I could hear him and see him (although his video was less than perfect), but, he could not hear me even though he saw me just fine.
After a few minutes of troubleshooting, the problem was that the desktop application did not like the Phoenix Duet as the microphone (see blog entry a few blogs down). The instant I switched the mic to the Logitech 9000, Mike could hear me. GREAT!
Gotta love Chat….it got us thru the no audio issue with flying colors!

Mike adjusted his video output so I could see a larger version of his video.
Very nice.

After we chatted a bit, Mike showed his desktop using the yellow “F” capability in the control box (I can live with the word “Frame”..since that is basically what this is, but, “D” for data, or “S” for sharing may be more videoconferencing-ish….I know, I know). Anyway…..the following pics show the results.
The quality of the sharing is VERY good. 🙂


In due course, we were joined by Matt (the M’s have it!)

Not having my good digital camera in the TracyVirtualOffice (I’m still used to working at home!) I took this snapshot on my cell phone (LG Shine) of the meeting as it can be seen on my desktop.

You can see that my desktop organization skills are lacking, but, it is nice that the windows are movable and re-sizable. You can see the control panel, the open frame window, and three video windows. My old Toshiba laptop was hardly straining. Very cool.
Summary
After finding and working around a couple of minor bugs (the critical error and microphone issue), the meeting went very well. We spent over an hour in a natural videoconference…no stumbling over words, no glitches in the video or audio.
Overall this was a very good experience for the small business person not familiar with videoconferencing or, for that matter, the more experienced videoconferencing user!
Appia’s video communicator / Applause Video provides features that make videoconferencing and collaboration a reality for the average small business person. A very good product that should do well! 🙂


