

UPDATE 1/3/2023: Just got notice from Arlo that they are ending the life of our cameras on April 1, 2023. Time to look for another security camera….stay tuned!
Due to an overwhelming negative response….Arlo now knows they fucked up and extended the end of life for awhile.
Hey, Arlo: I still have a rotary phone that works…..it’s called backwards compatibility.
It’s Christmas 2017 and Santa brought me a new security camera: The Netgear Arlo Pro.
It has been several years since we installed our Uniden security cameras and even though they still work great and are super reliable; the software is old and was poorly designed in that when it gets to the end of memory it stops recording. Also, to view the recordings, you can only view those events via the base station, and, sadly, the unit’s software could not be upgraded (I tried and tried…..).
Time and technology marches on……and it was time for a security camera system upgrade.
I installed the Netgear Arlo Pro on December 27, 2017 and so far so good. The Arlo Pro has a long long way to go to prove itself as reliable as the Uniden, but, so far there have been no hardware issues. As for software, well……..it has already far surpassed the Uniden as I can easily control the cameras and view the recorded events, from anywhere, using the Android and IOS apps. There are a few little bugs, but, none that are critical.
The base station syncing and installation of the all-wireless cameras was super simple.
The Basics
The Arlo Pro cameras are COMPLETELY wireless which means they are battery operated and wirelessly communicate with the base station. The base station needs to be hard-wire connected to your router, but, since we already had the Uniden hard-wire connected, the transition to the Arlo base station was very easy. Cut and paste. 😉
The front of the base station (see picture below) has three LEDs showing the status of the Arlo Pro system. Three green LEDs are a good thing, the LEDs are: Power, Network, Cameras (left to right).

The back of the Arlo Pro (see picture below) has 2 USB ports, power, and the RJ-45 ethernet connection.
I took an old 14 gig USB dongle and plugged it in to one of the USB ports to record the video in addition to the free 7 days of rolling storage on the web. Incidentally, the recordings we access via our smartphone apps are from the web. To see the locally stored recordings, I have to plug the USB dongle into my computer. Luckily, the locally recorded video is very memory efficient (so far a bit over 600 meg with very heavy testing usage) so it looks like I will be recording for over a year before memory roll-over.
There is a siren on the base station that you can fire up from the app. I have not yet tried that, but, they say it is loud!

Arlo Cameras
The Arlo Pro camera is shown below. The green arrow is pointing to the “sync” button which you need to press while the camera is close to the base station for the two to sync up. The camera lens is the red arrow, and the infrared motion detector is the purple arrow. Note: The Uniden triggered with spider webs, flags waving, rain, etc. The Arlo Pro only triggers when it sees a heat source. Update August 2019: Hmmm, they changed this to also trigger on movement…..arrrrgh. Not a good thing. 🙁

The back of the camera (see picture below) has a magnetic indentation (red arrow) that fits into the indoor camera mounts (See the top image above), a screw connection for the outside mount (black arrow), and a power port to charge the batteries (purple arrow). I wish they had a separate power charging device, but, alas this is all that came with the Arlo Pro system we purchased from Costco. I can run power to the outside camera should I decide to do that in a few months. POWER UPDATE (Feb 21, 2018): I ran power to the front camera yesterday as the battery life was significantly less than a month long (lots of cars tripping it, and we like to “monitor” the neighborhood). I drilled a nice 1/2 inch hole to feed the power from inside the garage to the camera. I then set the motion sensitivity to 100% and let ‘er rip. So far so good.

The picture below shows how the battery fits into the camera unit. Just press the back button on the camera top to open it, then drop in the battery. There is a small latch to move when removing the battery for charging. After over a week of messing around (a lot) with the outside camera, it is at 65%. I want to see how long it keeps working. The batteries come fully charged from the factory.

Arlo Pro App
Installation of the Arlo Pro app on both Android (my Pixel XL) and IOS (Lori’s iPhone 7+) was easy and both work reliably.
From each app you can see the active cameras, watch LIVE video, hear live audio, take a snapshot, zoom in / out, or watch what happened in the past 7 days using the free 7 day cloud recording that comes with the Arlo Pro (Remember: As I mentioned above, I have a USB dongle thingy connected that is also recording locally).
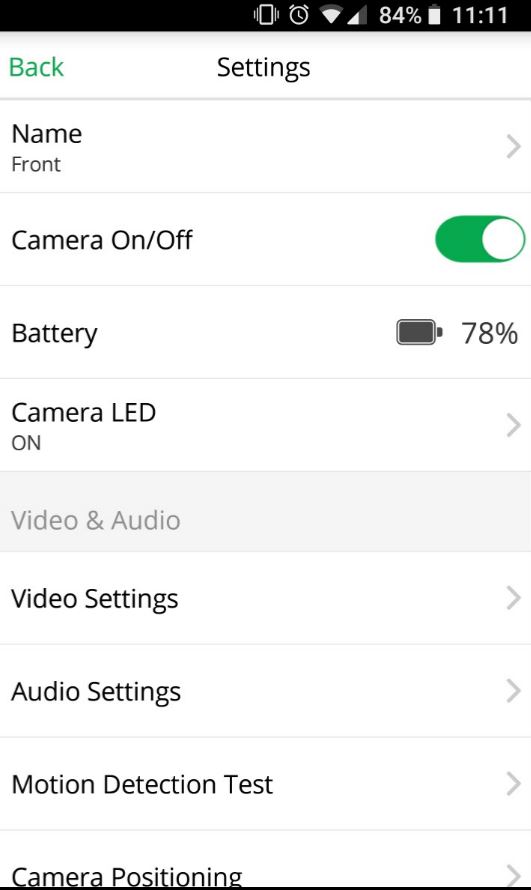
You can also control the cameras via the app (in fact that is the ONLY way to control the cameras) by turning them on / off, changing the recording parameters, changing the motion detection parameters, etc.
Here are some pics of the Android version of the app installed on my Pixel XL (running Oreo, if that is interesting to you).
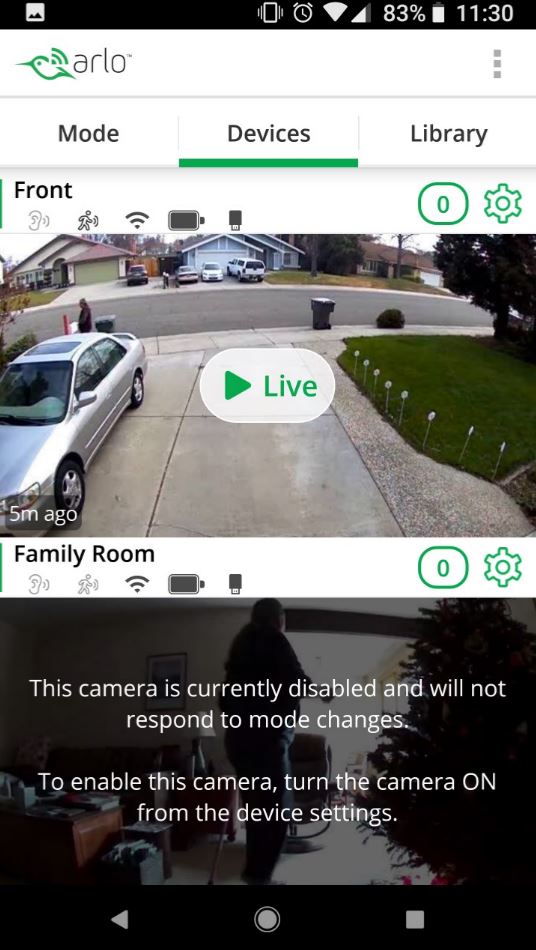
The front camera (see pictures below) is “on” 24×7 while our Family Room and Front Door cameras are turned off until we leave the house. I can turn them on (by clicking the gear icon or setting up geofencing) from the car, or the movies, or where-ever, if I forget to do it before leaving the house. Very cool. I can also set up local smartphone notifications and email notifications for EACH camera. The front camera is too active to set up notifications, but, I will set the email notifications on for the inside cameras that are on only when we leave the house. As a rule, I keep the microphone turned off, but, turn on the speaker so we can talk to Blaze if we leave him at home.

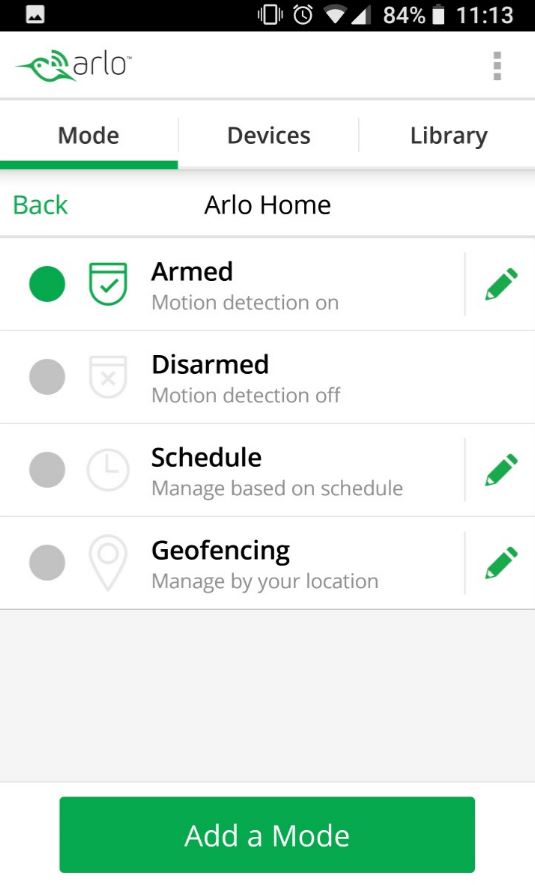
Clicking on the Mode menu, then into the Armed menu, you can select the options to control each of the three cameras we have in operation.


The first option is our outside camera. I can change the words, but, hey they are in order, at least in my head. You can see that I can change how it detects motion, audio, and how it records. Further down and not shown (lazy) are the options to turn on email and local smartphone notifications.

In the Motion setting, you can change the sensitivity to motion. I am actively playing with the sensitivity and as I write this, I have it down to 85%, which I think means I will record less action. We will see. I am still deciding if I will monitor the neighbors homes with a high sensitivity, or just us with a lower sensitivity.

In the recording settings menu (see picture below) you have the option of selecting either the activity option where the Arlo Pro records only while there is activity, or for a fixed length of time where you can set the time it records after activity is detected. Note: With the Uniden, every recording was 2 minutes long with no options to change it. As part of my testing, I had the outside camera set to 20 seconds for awhile, but, have settled on the camera deciding how long to record (at least for now).

Physical Installation
I installed the outside camera using the included stand (see the image below) and, so far, I am just placing the inside cameras on flat surfaces. There are magnetic mounts (see top picture) that I can mount on the wall if I decide I need/want them.
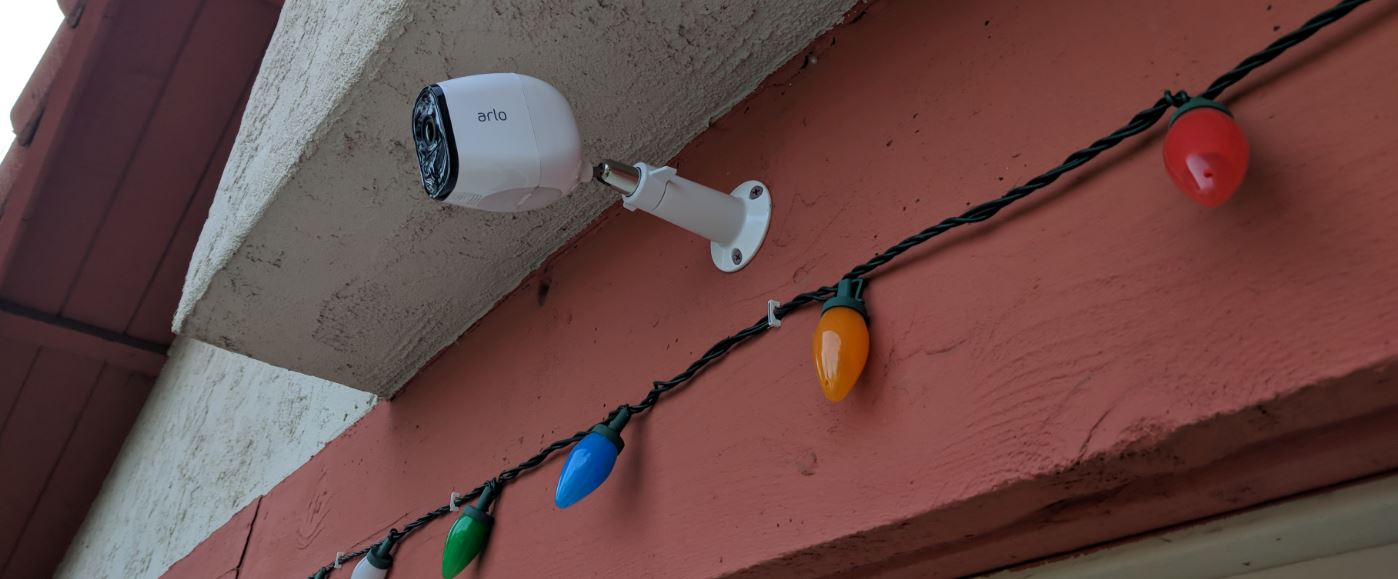
The picture below shows how I installed the outside, main, camera using the included mounting bracket: Three wood screws and endless fidgeting to point it in the right direction finally resulted in an installation.


Inside the house, I simply use the cameras on flat surfaces. See the camouflaged camera facing the front door. Perfect Panda colors. 🙂

Picture Quality
The snapshot picture quality rocks compared to the Uniden. Below are day and night screen shots from my Pixel XL. The resolution of the Arlo Pro is 720p which is much better than the Uniden, but, not as good a some security cameras with 1080p resolutions.
Overall, I am very happy with the resolution.


Video quality
Here are some examples of videos taken in daylight and at night. As with the picture quality, the video quality is worlds above that of the Uniden.
Summary
The Netgear Arlo Pro, so far, is reliable and is very easy to use.
I can easily access live and recorded video (and audio should you choose to activate the mic) and I can control the cameras, from anywhere, using the Android or IOS apps on our phones. The Arlo Pro is affordable, easy to install, and comes with 7 FREE days of rolling cloud-based storage as well as local USB storage (that also rolls).
Geek on!
UPDATE 5/14/2020: If you have been missing important events, try this: Set the video recording to 10 seconds (don’t use the automatic length). The Arlo is MUCH better at catching events…sometimes multiple times. 🙂
UPDATE 1 year later: Our Arlo Pro is working great! A few minor issues, but, all of them were resolved very quickly. Very cool!


